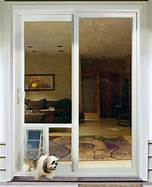
How to Install a Sliding Glass Pet Door
If you're tired of opening the door for your pet every time they want to go outside, a sliding glass pet door is a great option. Sliding glass pet doors are easy to install and can be used on most sliding glass doors. Here's a step-by-step guide on how to install a sliding glass pet door:
Materials Needed:
1. Sliding glass pet door kit
2. Measuring tape
3. Level
4. Pencil
5. Utility knife
6. Hacksaw
7. Drill
8. Screwdriver
9. Caulk
Steps:
1. Measure the Glass Door:
Use a measuring tape to measure the width and height of the glass door. Make sure to measure the door in several places to get an accurate measurement.
2. Mark the Cut Line:
Once you have the measurements, use a level to mark a horizontal line on the glass door where you want to cut it. Make sure the line is level and straight.
3. Cut the Glass Door:
Use a utility knife to score the glass door along the marked line. Then, use a hacksaw to cut the glass door along the score line. Be careful not to apply too much pressure when cutting the glass door, as this could cause it to crack.
4. Install the Pet Door Frame:
Position the pet door frame in the opening that you created. Make sure that the frame is level and centered. Then, use screws to secure the frame to the glass door.
5. Install the Pet Door:
Place the pet door into the frame. Make sure that the door opens and closes smoothly. Then, use screws to secure the pet door to the frame.
6. Caulk the Pet Door:
Use caulk to seal the gap between the pet door and the glass door. This will help to prevent leaks and drafts.
7. Test the Pet Door:
Once the caulk has dried, test the pet door to make sure that it opens and closes smoothly. If the door is not working properly, adjust the screws until it does.
8. Enjoy Your New Pet Door:
Now that your pet door is installed, your pet can enjoy the freedom to come and go as they please.
Declaration: All article resources on this website, unless otherwise specified or labeled, are collected from online resources. If the content on this website infringes on the legitimate rights and interests of the original author, you can contact this website to delete it.